TK Mitra Bunda
August 2026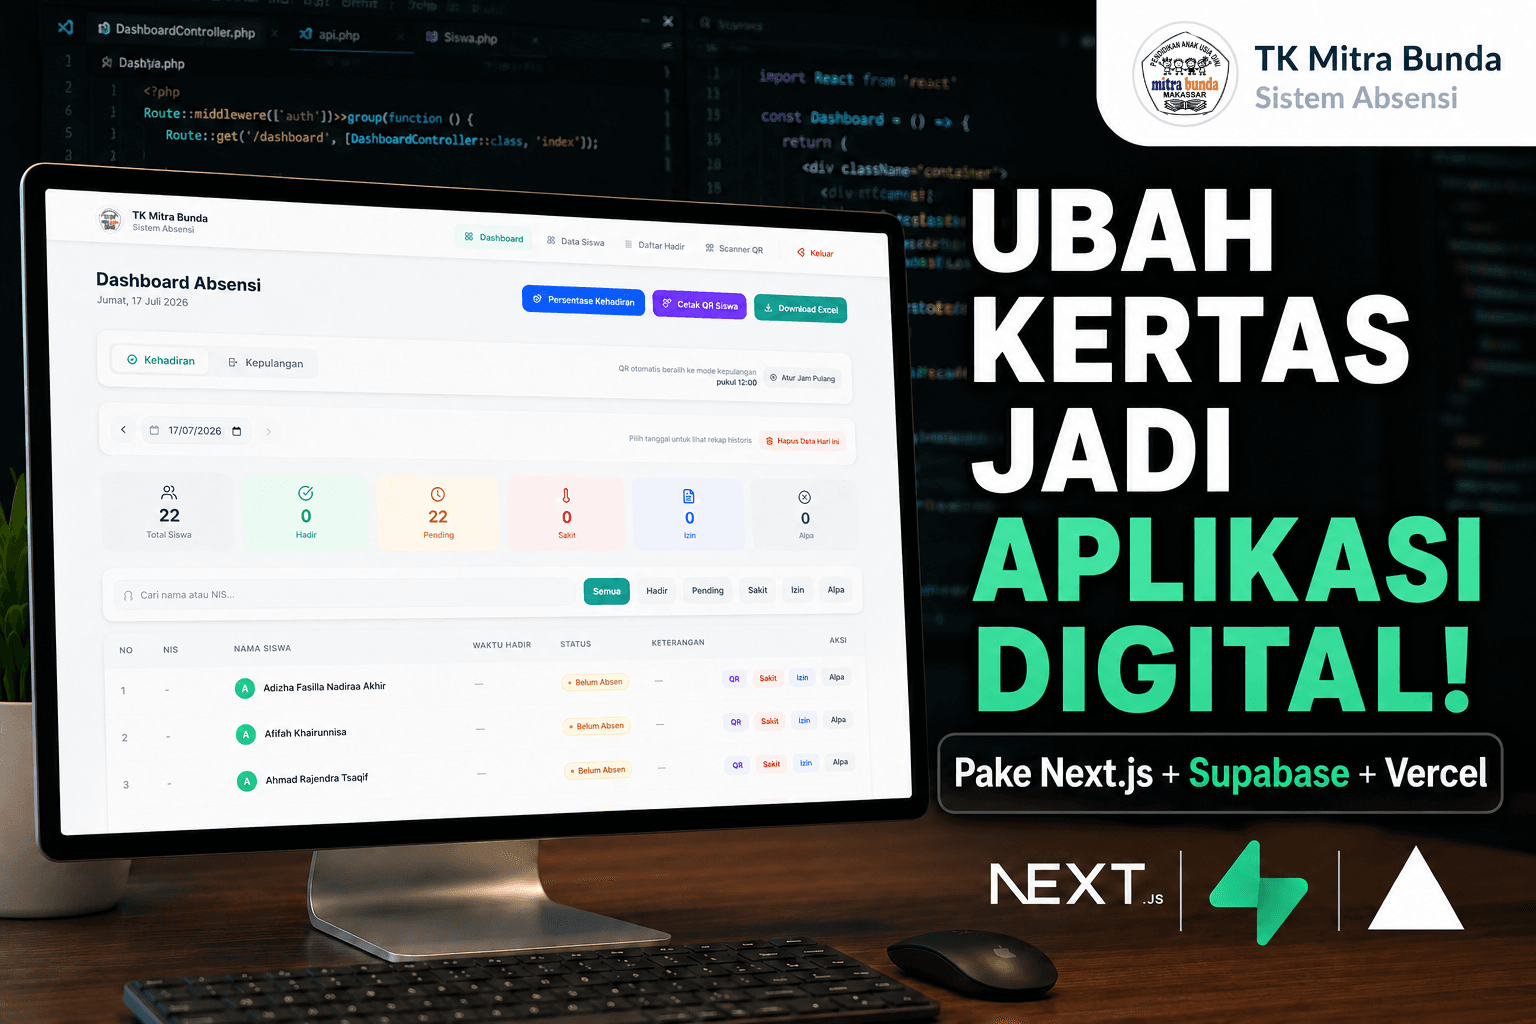
Curious how I built this?
Read the full case study & technical deep-dive on Medium →
The full article covers the problem background, technical architecture, lessons learned, and business impact — ideal for HR and IT Recruiters who want to understand the technical depth of this project.
Read on MediumAbout the Project
The TK Mitra Bunda Attendance System is a full-stack web application that fully digitalizes the kindergarten attendance process — from recording student arrivals in the morning, departures at noon, to exporting monthly reports to Excel. Built as a real client project for an educational institution, this system replaces slow and error-prone manual paper-based attendance recording.
Using QR Code and Text-to-Speech technology, teachers simply place a tablet at the school gate — the system works automatically without manual interaction. Admins can monitor, manage, and download reports at any time from any device.
TK Mitra Bunda Attendance System — User Guide
This guide explains how to use the QR Code-based attendance system, from login to real-time student attendance monitoring.
Page Overview
| Page | URL | Access |
|---|---|---|
| Login | / | Public |
| Dashboard | /dashboard | Admin (Login) |
| Student Management | /siswa | Admin (Login) |
| Attendance Scanner | /scan | Admin (Login) |
| Attendance Statistics | /dashboard/statistik | Admin (Login) |
| Monitor Attendance | /pantau | Public (Read-only) |
1. Login Page ( / )
The first page encountered when opening the application. Only registered accounts can access the admin pages.
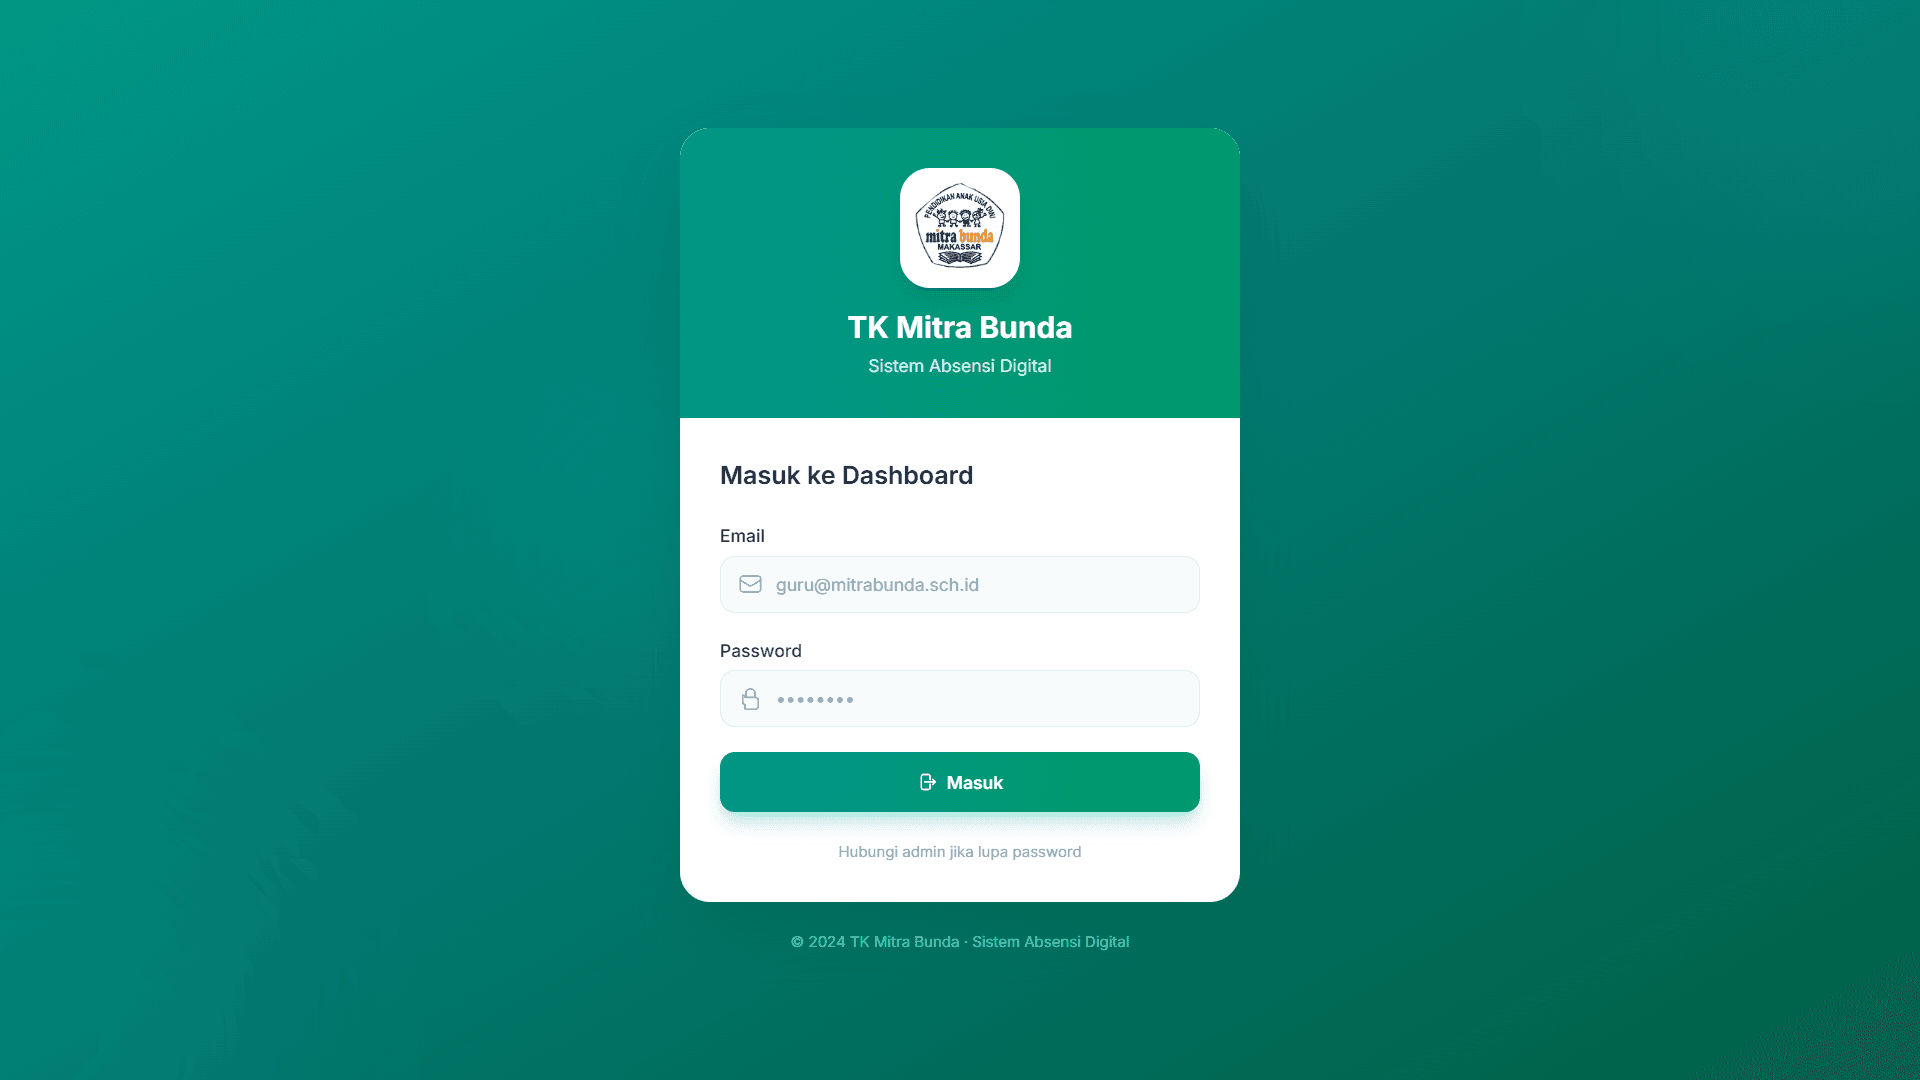
Login page view — enter admin account email and password to access the system.
How to Login:
- 1Enter your admin account Email and Password in the form.
- 2Click the "Masuk" (Sign In) button.
- 3If successful, you will be automatically redirected to the Dashboard.
💡 Note: This app uses Supabase authentication. If you forget your password, contact the system administrator to reset your account.
2. Dashboard Page ( /dashboard )
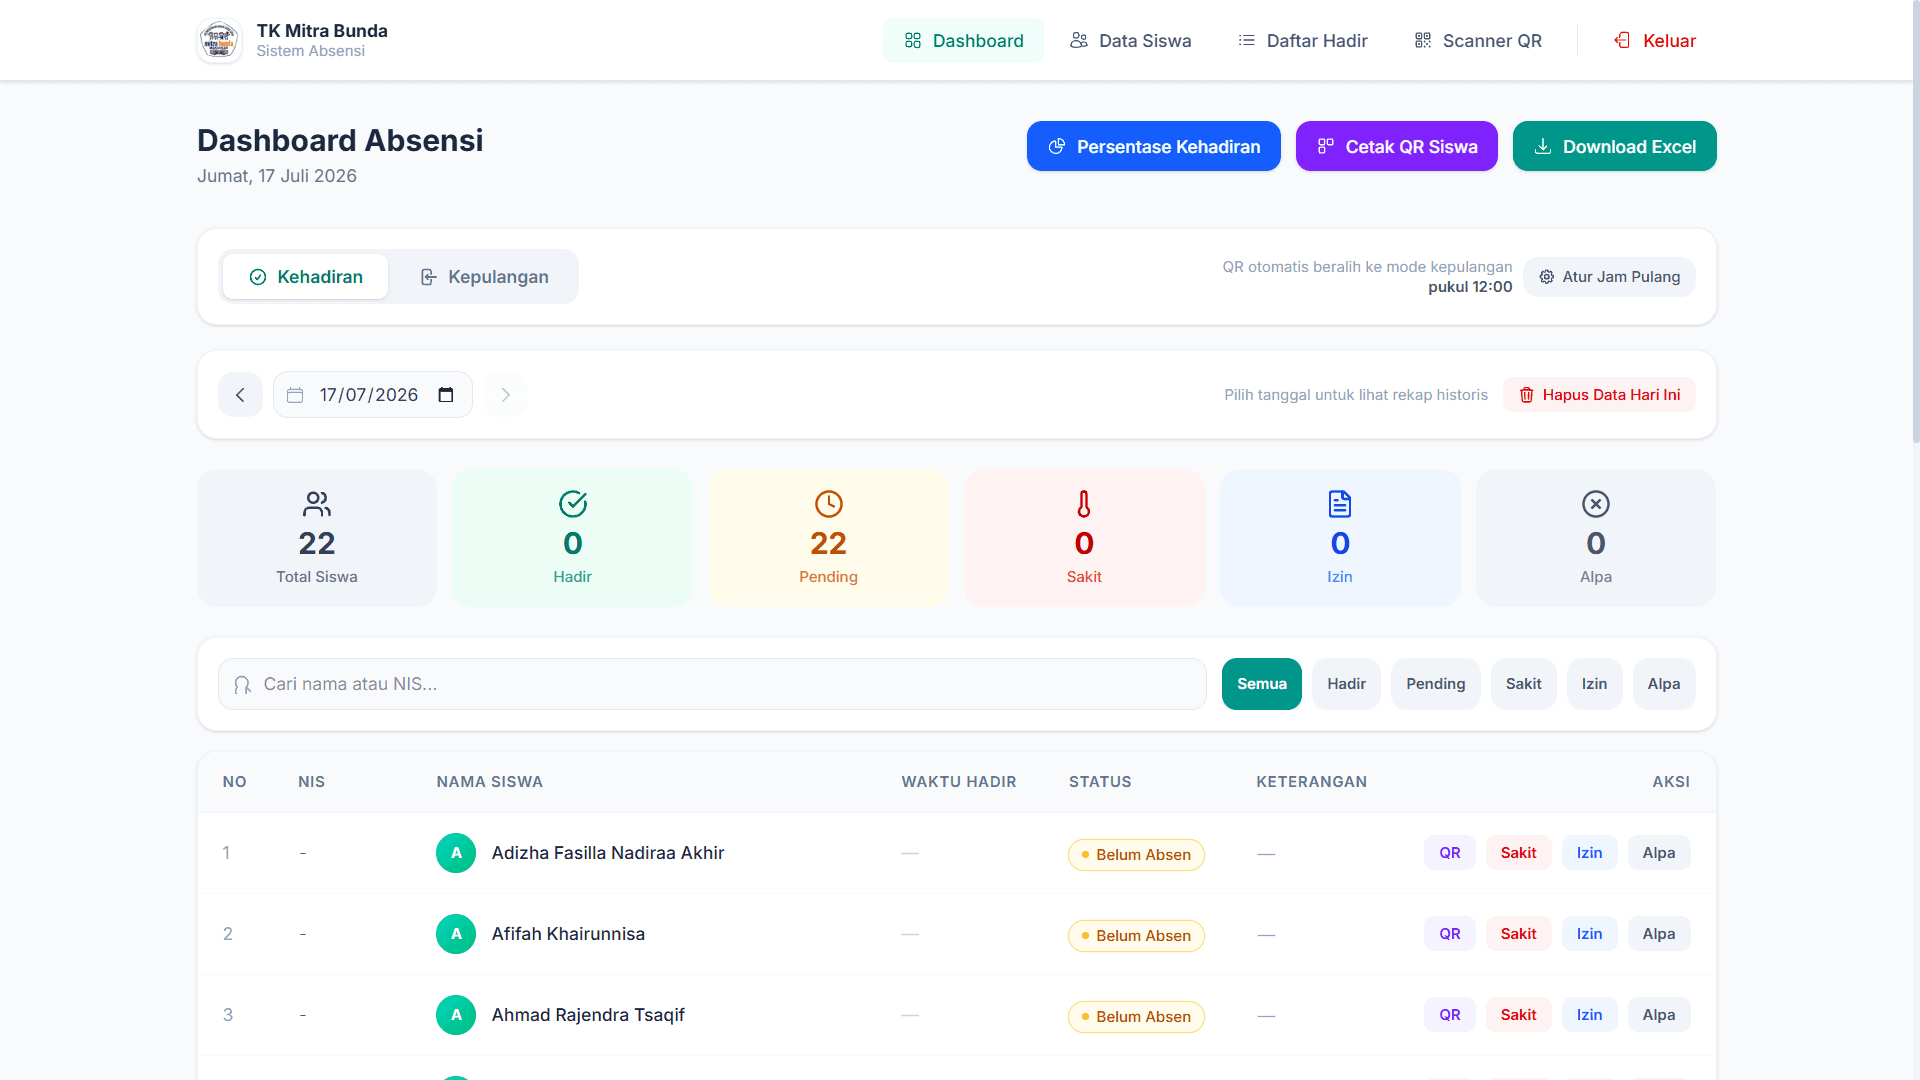
Main Dashboard view — the control center for monitoring daily attendance in real-time.
The main control center for managing and monitoring daily attendance. At the top is today's date as a reference, and a 'Historical View Mode' indicator if you are viewing past date data.
Statistics Cards (6 Summary Cards):
| Card | Description |
|---|---|
| Total Students | Total number of students registered in the system |
| Present | Number of students recorded as present today |
| Pending | Students who don't have attendance data yet |
| Sick | Number of students recorded as sick |
| Excused | Number of students with excused absence |
| Absent | Students absent without explanation |
Navigation Buttons (Top Right):
- 🔵 Attendance Percentage — Goes to the statistics page with a Pie Chart.
- 🟣 Print Student QR — Exports all student QR Codes into a PDF.
- 🟢 Download Excel — Downloads attendance data as an .xlsx file.
Display Modes (2 Modes):
- Attendance Mode (default): Displays each student's arrival status (Present, Sick, Excused, Absent, Pending).
- Dismissal Mode: Displays each student's departure status (Departed / Not Yet Departed).
⏰ Dismissal Time Setting: Next to the mode tabs is the Dismissal Time setting (HH:MM format). This time is used by the system to automatically switch the QR Scanner from 'Attendance' to 'Dismissal' mode.
Student Data Table Features:
- Click the name/row to view details.
- Change Status: Click the button in the status column to change attendance (Present / Sick / Excused / Absent).
- Delete Today's Attendance: Deletes the student's attendance record for today.
Filter & Search:
- Status Filter: Tab buttons to filter the view by status (All, Present, Pending, Sick, Excused, Absent).
- Date Column: Date input in the top right to view historical data from previous days.
Download Excel (Daily & Monthly):
When the Download Excel button is clicked, a modal appears with 2 options:
- Daily: Downloads attendance data for a specific date.
- Monthly: Downloads the attendance recap for an entire selected month.
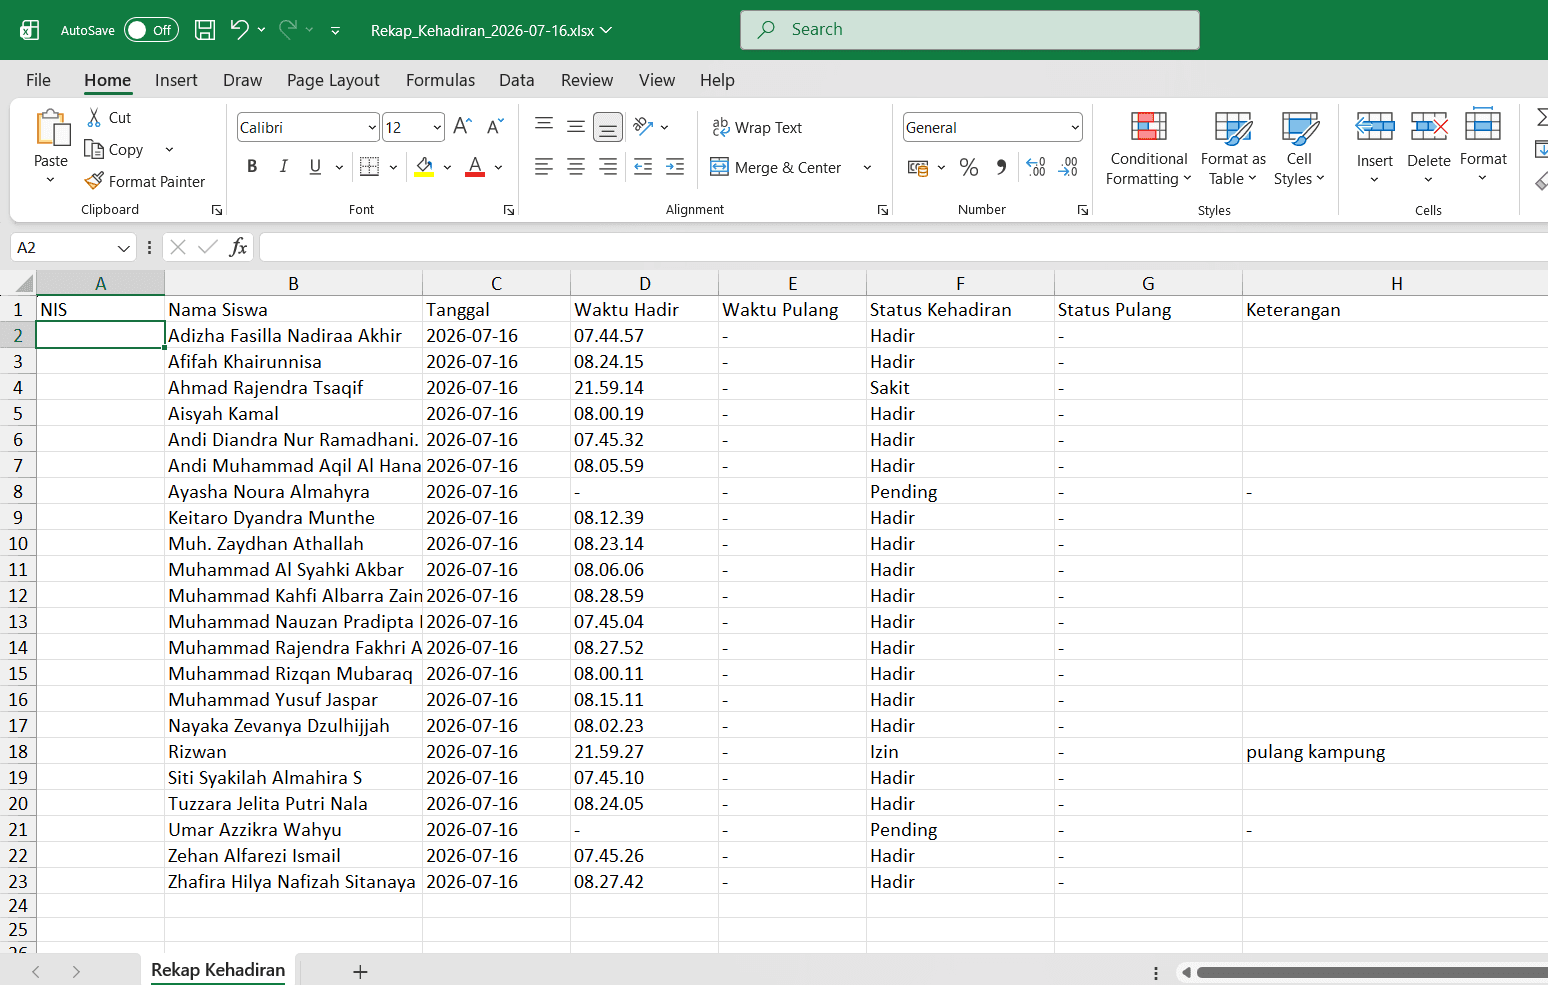
Sample Daily attendance Excel report — contains attendance data for a specific date.
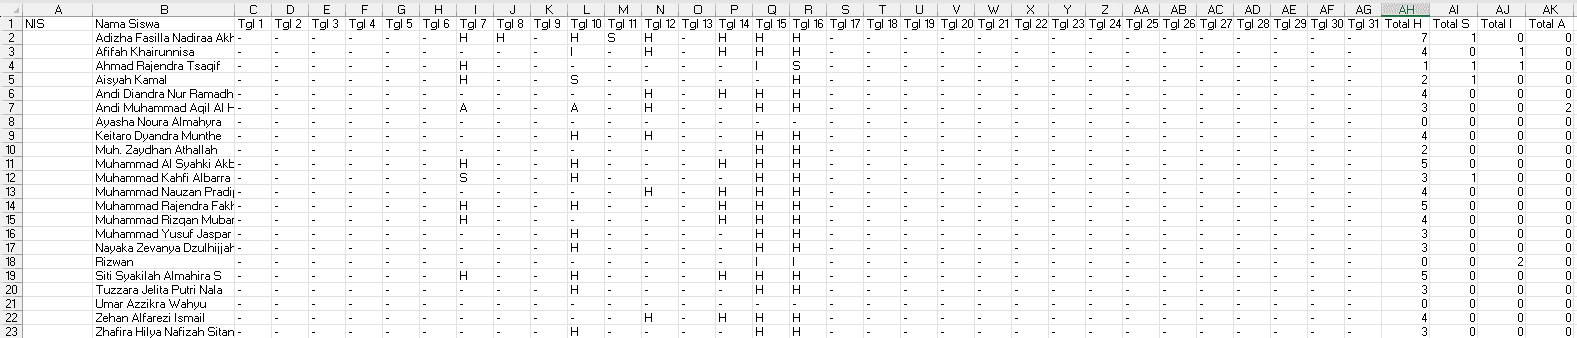
Sample Monthly attendance Excel report — contains the full month's recap with daily columns.
3. Student Management Page ( /siswa )
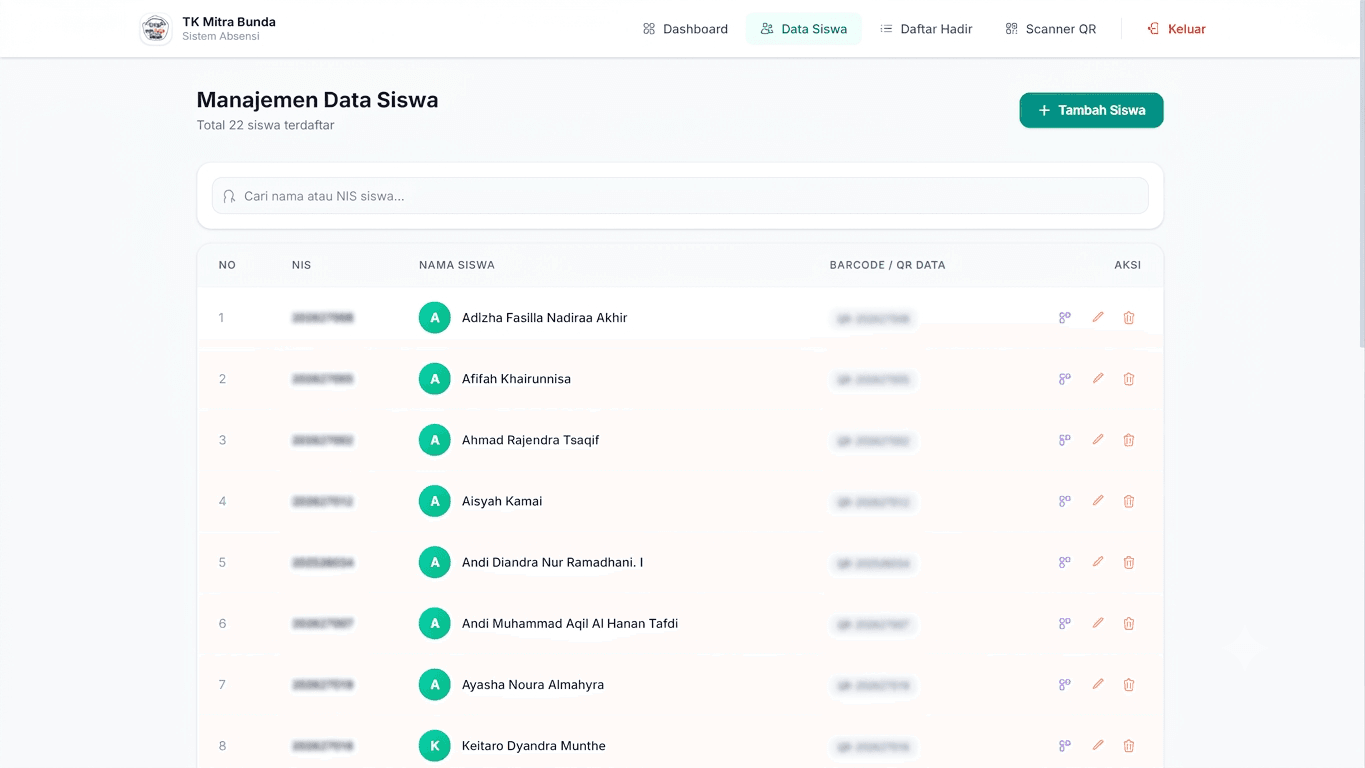
Student Management page — manage student data with Add, Edit, Delete, and QR Code download features.
Page for managing all student master data. Displays a table with columns: No, NIS, Student Name, Barcode/QR Data, and Actions.
Add a New Student:
- 1Click the "+ Tambah Siswa" button at the top right.
- 2Fill the form: NIS (required), Full Name, and Barcode / QR Data (auto-filled as
QR-{NIS}, editable). - 3A QR Code preview appears instantly as QR Data is typed.
- 4Click "+ Tambah Siswa" to save.
Edit Student Data:
- 1Click the yellow pencil (edit) icon on the student's row.
- 2Edit the necessary data in the form.
- 3Click "Simpan Perubahan".
View & Download QR Code:
- 1Click the purple QR icon on the student's row.
- 2A modal displays the large QR Code with the student's name and NIS.
- 3Click "Download PNG" to download the QR Code as an image.
Delete Student:
- 1Click the red trash (delete) icon.
- 2Confirm the deletion in the dialog that appears.
⚠️ Warning: Deleting a student also permanently removes all their attendance history and cannot be undone.
4. Attendance Scanner Page ( /scan )
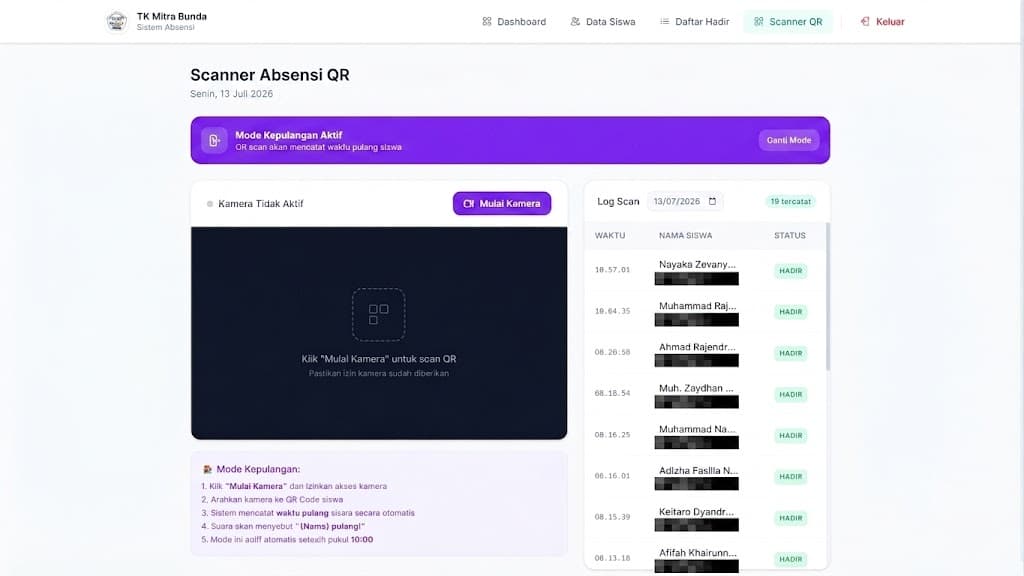
QR Scanner page — the main scanning interface operated at the school gate every day.
The heart of the attendance system. Accessed on a device (tablet/laptop) placed at the school gate to record student arrivals and departures.
Active Mode Banner:
- 🟢 Green — Attendance Mode: QR scan will record the student as Present.
- 🟣 Purple — Dismissal Mode: QR scan will record the student's departure time.
Mode switches automatically based on the dismissal time set in the Dashboard. You can also change it manually with the "Ganti Mode" button.
How to Use the Scanner:
- 1Click the "Mulai Kamera" button on the scanner panel.
- 2Allow camera access in the browser.
- 3Point the camera at the QR Code on the student's card.
- 4The system will automatically recognize the QR and process the attendance.
- 5A confirmation voice will sound: "[Student Name] hadir!" or "[Student Name] pulang!"
- 6A pop-up notification appears as a success confirmation.
Scan Status:
| Condition | System Response |
|---|---|
| QR recognized, not yet recorded | Attendance successfully recorded ✅ |
| QR recognized, already recorded | Warning: "already recorded" ⚠️ |
| QR already departed (dismissal mode) | Warning: "already departed" ⚠️ |
| QR not recognized | Error: "Barcode not recognized" ❌ |
Scan Log (Right Panel):
Displays a list of all students recorded on the selected date. A date input is available to view historical logs.
5. Attendance Statistics Page ( /dashboard/statistik )
An analytics page displaying student attendance distribution visually. Access it by clicking the "Persentase Kehadiran" (blue) button on the Dashboard.
Time Filter (3 Options):
- This Week: Data from Monday to Sunday of this week.
- This Month (default): Data throughout the current month.
- This Year: Year-long data recap.
Statistics Detail Cards:
| Category | Color | Description |
|---|---|---|
| Present | 🟢 | Total attendance records |
| Sick | 🔴 | Total students recorded as sick |
| Excused | 🔵 | Total students with excused absence |
| Absent | ⚫ | Total unexcused absences |
| Pending | ⬜ | Estimated students without attendance data |
💡 Pending Note: 'Pending' data is estimated: total students multiplied by school days in the period, minus existing records.
6. Attendance Monitor Page ( /pantau )
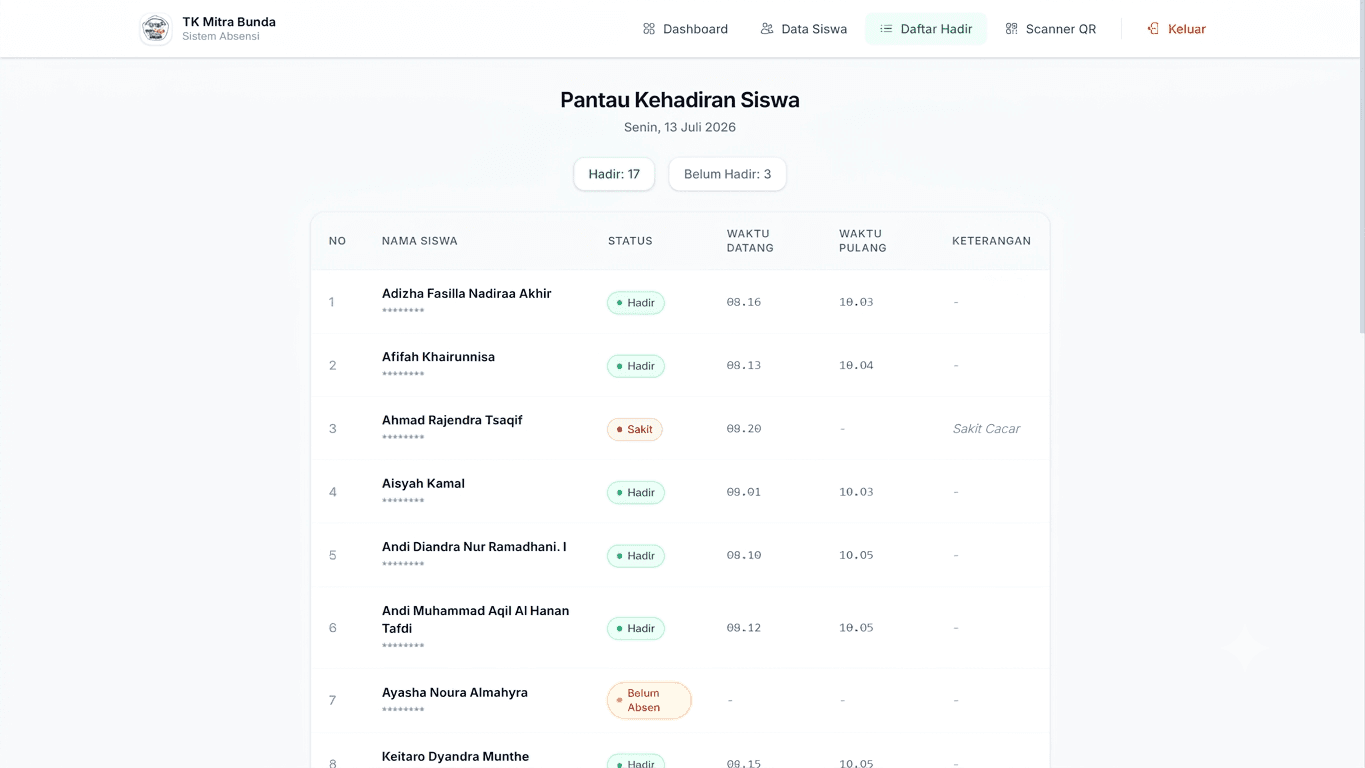
Attendance Monitor page (read-only) — accessible without login, ideal for displaying on school monitor screens.
A read-only page accessible without login — ideal for displaying on monitor/projector screens at school.
Main Features:
- Displays all students with their attendance status for today.
- Auto-refresh every 5 seconds without manual reload.
- Shows a quick summary: number of Present and Not Yet Present students.
- Responsive layout: Table on desktop, Cards on mobile with color indicators on the left.
Columns Displayed (Desktop):
| Column | Description |
|---|---|
| No | Row number |
| Student Name | Full name and NIS |
| Status | Status badge (Present / Sick / Excused / Absent / Pending) |
| Arrival Time | Time when QR was scanned in |
| Departure Time | Time when QR was scanned out |
| Notes | Additional notes (if any) |
💡 Tip: This page is ideal to open in a separate browser tab on a large screen for real-time monitoring throughout the day without re-logging in.
Recommended Daily Workflow
Open /scan → Click "Mulai Kamera"
Students arrive → Scan QR Card → System records Present + voice confirmation
Open /pantau on another screen for real-time monitoring
System automatically switches to Dismissal Mode after dismissal time
Students depart → Scan QR Card → System records departure time
Open /dashboard → Download Excel for daily recap
Check /dashboard/statistik for periodic analytics
For IT Recruiter / HR
Want to see how this system was designed & built from scratch?
Full case study available on Medium, covering system architecture, technical decisions, and real-world impact delivered.
Read Case Study on Medium